Recently on Twitter, I saw a dynamic dock Icon created by Neil Sardesai:
Had a bit of a silly idea and I just *had* to build it pic.twitter.com/wQdKSYzuYW
— Neil Sardesai (@neilsardesai) February 17, 2021
First, I thought it was an animation showing off a cool concept. Then I thought it was a showcase of hacking magic. When Neil posted his project on GitHub, I learned that it is super easy to create a dynamic dock icon.
Meet the NSDockTile
Apple created a class called NSDockTile.This class controls a visual representation of the app miniaturized window and app icon as they appear in the dock.
The API is easy to use. To show a custom view inside the dock, we need to set our view to the contentView property and call the display() method.
Ok, that's enough theory. Let's see it in action.
Custom Clock Icon
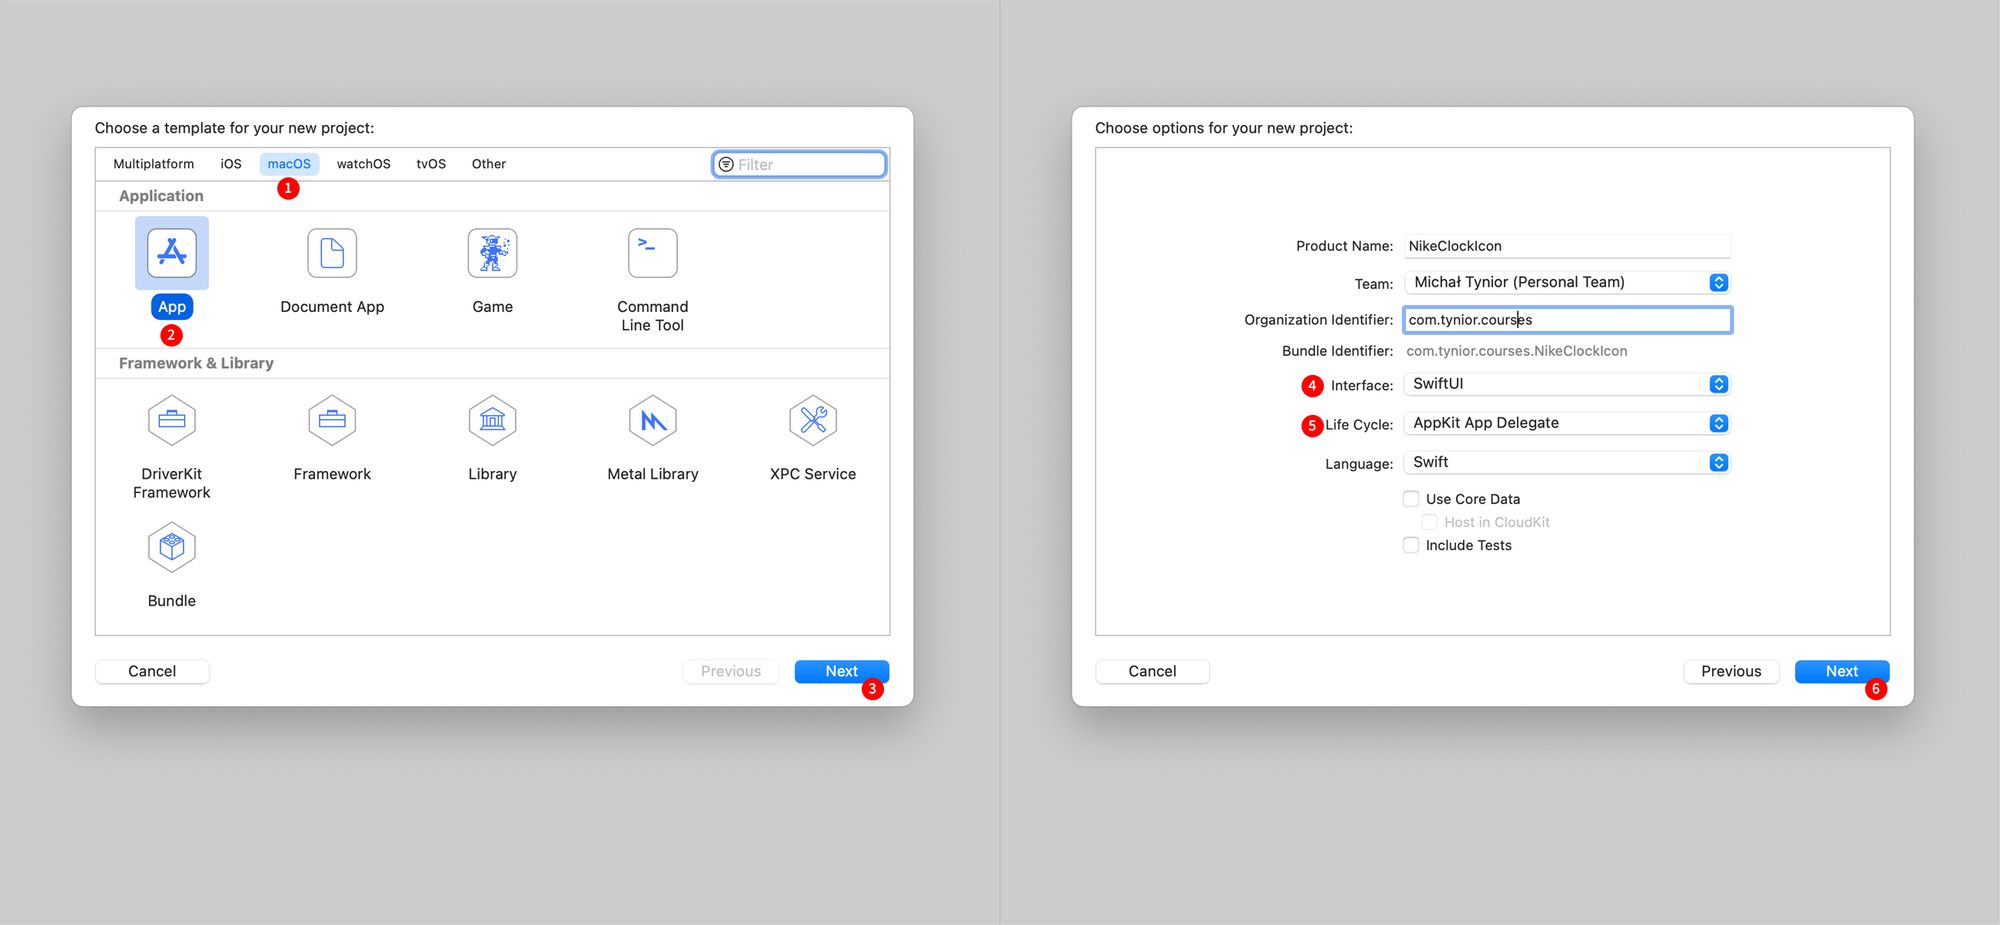
In this example, I will show you how to create a dynamic icon that looks like a Nike Watch Face. Let's start by creating a simple SwiftUI macOS application:
Once the project is ready, we can write our Icon View:
import SwiftUI

struct ClockView: View {
    @State var currentTime: (hour: String, minute: String) = ("", "")
    let timer = Timer.publish(every: 1, on: .main, in: .common).autoconnect()

    let backgroundColor = Color.black
    let clockColor = Color(red: 0.841, green: 1.0, blue: 0.257, opacity: 1)

    var body: some View {
        GeometryReader { parent in
            let fontSize = parent.size.height * 0.4
            let clockFont = Font.custom("Futura-Bold", size: fontSize)
            let hSpacing = fontSize * 0.25

            VStack {
                Text(currentTime.hour)
                    .padding(.bottom, -hSpacing)
                Text(currentTime.minute)
                    .padding(.top, -hSpacing)
            }
            .font(clockFont)
            .frame(idealWidth: parent.size.width, maxWidth: .infinity, idealHeight: parent.size.height, maxHeight: .infinity)
            .foregroundColor(clockColor)
            .background(backgroundColor)
            .cornerRadius(parent.size.height * 0.2)
            .shadow(radius: 3)
        }
        .onReceive(timer) { currentDate in
            let components = Calendar.current.dateComponents([.hour, .minute], from: currentDate)
            let hour = components.hour ?? 0
            let minute = components.minute ?? 0

            currentTime = (String(format: "%02d", hour), String(format: "%02d", minute))
        }
        .padding(10)
    }
}
Let's dissect this view into smaller parts:
 @State var currentTime: (hour: String, minute: String) = ("", "")
 let timer = Timer.publish(every: 1, on: .main, in: .common).autoconnect()
To refresh the time, we are using a Timer. Timers are super convenient to use in SwiftUI. In one line of code, we can set up and start a timer that will emit an event every second. We can hook up to this event using the onReceive() method.
This method listens to events, and if one occurs, it executes the callback. In our case, every time the timer emits a new current Date, our callback extracts the current hour and minute, then saves those values in the currentTime tuple:
GeometryReader {
    // ...
}
.onReceive(timer) { currentDate in
    let components = Calendar.current.dateComponents([.hour, .minute], from: currentDate)
    let hour = components.hour ?? 0
    let minute = components.minute ?? 0

    currentTime = (String(format: "%02d", hour), String(format: "%02d", minute))
}
Because the currentTime has the @State wrapper, every time the value of the property changes, the UI is updating itself automatically.
Speaking of the UI, let's see how to create a view that looks like an icon.
The parent element is a GeometryReader that has a 10pt padding. The view inside the Dock takes the entire available height. For our clock, we don't want that. We want the clock to look like an icon, and padding compresses the view to the appropriate size. The 10pt margin is an arbitrary value, and it is not perfect, but it is close enough :)
Ok, that's great, but you might ask why do we need the GeometryReader in the first place? Well, we don't know the size of the Dock. Therefore we can not use the fixed values. We need to base all our measurements on the height GeometryReader:
GeometryReader { parent in
    let fontSize = parent.size.height * 0.4
    let clockFont = Font.custom("Futura-Bold", size: fontSize)
    let hSpacing = fontSize * 0.25

    // ...
}
If we do this that way, our clock will resize appropriately.
The rest of the view is super simple. We have two labels inside the Vertical Stack View, which is styled to look like a macOS app icon.
The only tricky thing might be the custom padding between the labels. The default padding is too big for the Nike Watch Face. The negative padding brings them together.
Now we have something to show in the Dock. So let's see how to use the NSDockTile.
How to use the NSDockTile
Fortunately, all the hard work is already done. Apple conveniently exposed the NSDockTile in the NSApp class, so all we need to do is, in the AppDelegate, set our custom view to the contentView property and call the display() method:
func applicationDidFinishLaunching(_ aNotification: Notification) {
    // ...

    let clockView = ClockView()
    NSApp.dockTile.contentView = NSHostingView(rootView: clockView)
    NSApp.dockTile.display()
}
That's it! There is only one catch here. We have a custom SwiftUI view, and NSDockTile expects an old good NSView. So we need to wrap our custom view with NSHostingView.
Now, when we run the app, we should see our custom clock in the Dock:

That was easy. Wasn't it?
Well, not exactly. If we let it run for a while, we can notice that the clock does not update the time 😞
That's because the NSDockTile does not redraw itself automatically. We need to tell it to redraw itself when something changes. Usually, there is a trigger that we can listen to and call the display() method when necessary. In our case, we don't have anything like this because the trigger is embedded inside the ClockView. Fortunately, we can add another Timer to refresh the view every second. It is not the most efficient way, but it will do the trick:
func applicationDidFinishLaunching(_ aNotification: Notification) {
    // ...

    let clockView = ClockView()
    NSApp.dockTile.contentView = NSHostingView(rootView: clockView)

    let timer = Timer.scheduledTimer(withTimeInterval: 1.0, repeats: true) { _ in
        NSApp.dockTile.display()
    }
    timer.fire()
}
For this article I used two separate timers, because it is easier to understand. For production code, I would use a shared publisher that triggers an event every second. This publisher would be then used by bothAppDelegateandClockView.
And now, we should have a live view inside the Dock:
Refreshing the NSDockTile every second is working fine, but keep in mind that this class was never designed for real-time rendering. If you increase the frequency of updates, let's say to 0.01 of a second, it is going heavily increase the CPU usage.
That's it. Also, the entire source code of this project is on my GitHub:
 mtynior
The NSDockTile was something that existed in macOS for a long time. It is a shame that not many applications use it nowadays. Especially when it is super easy to use. I had a lot of fun playing around with this API:
Inspired by @neilsardesai I decided to experiment with NSDockTile, and I created a CPU monitor:#SwiftLang #SwiftUI #xcode #screenshotsaturday pic.twitter.com/Zm6A3CYHr4
— Michal Tynior (@mtynior) February 27, 2021
I hope this article explained how to display a custom view inside the macOS Dock, and I convinced you to use the NSDockTile in your app 😉
Comments
Anything interesting to share? Write a comment.